
![]()
When clicking on a store link within this site and super-feeder.com websites, you will be directed to: http://www.superfeederstore.com
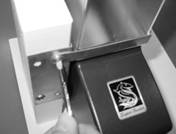
Instructions are for the CSF-3 cat Super Feeder®, but basic operation is the same for all Super Feeders®.
Power supply shown in picture #6 may be an outdoor type power supply with a 6' cord and plug at the end.
You may control your Super Feeder from anywhere using your Smart Phone with our Wi-Fi Socket or even Xfinity Home accessories like a camera, etc...
1
2
3
4
Very important!! In step 1 make absolutely sure that the extension is firmly and fully pressed on the machine where you will see the small half-moon recess in the machine through the small screw holes in order for the screw to fully protrude into that recess and locks the extension in place. If you do not do that properly, the extension could be pulled loose by a pet pulling back on the stack, which will then bend the metal strap and loosen the whole stack of extensions. If you are not able to properly lock any extension, large hopper or lid in place, do not use the metal washer and only spin the small screw far enough to go into the half-moon recess to lock the item place. We also have oversized screws available on our store if ever needed.
5
6
7
8
9
10
11
12
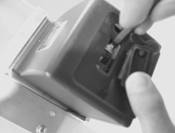
(1) First, install one clear extension on feeder and secure it with one small screw and washer (in feeder hardware bag) on one side only, opposite side of chute opening that will face the "L" shaped metal bracket. (2) Install the bracket with four 3/8" long screws located in feeder hardware bag. (3)Install metal strap with one small screw and no washer on front side. (4) Install "L" bracket and retaining strap to wood mount of your own with two large head screws on each side of bracket (4 ea. Supplied in feeder hardware bag), or as directed by plastic stand instructions using eight ¼ inch long screws. (5) Plug feeder's power supply jack plug into feeder side jack. (6) Plug feeder's power supply directly into a wall outlet (power supply may be an outdoor type with 6' wire and plug with outdoor type feeder package) and the feeder should run dry for one cycle along with a steady "power-on" blue light and green light in the housing while the feeder is running. The green light should go off when the motor stops and the blue light should remain on while the feeder is powered. (7) Adjust black “volume” screw so opening between roller and gate is slightly below the largest size across of the kibbles and fill the feeder with one or two clear extensions. Some pieces may initially fall through which is normal. (8) Lift rubber plug to expose green feed time controller, place bowl under feeder and "tap" reset switch momentarily to activate feeder. If not enough food was dispensed, turn *controller dial or shaft (9) clockwise, then push tap reset switch again and note amount of food dispensed. If too much food came out, turn *controller dial or shaft counterclockwise. Always turn controller *dial or shaft in fine increments! If still not enough food is dispensed at maximum time setting, turn the volume screw (7) counterclockwise and try again. If still not enough, program extra feed cycles with remote timer. Time duration of feeder's own adjustable feed cycle is what primarily determines amount of food dispensed, not the external timer. When the rubber plug is closed (10), push the right side labeled “push” for additional feed cycles while the feeder is powered (no need to open rubber plug). (11) After completing steps 5 through 10, Program your timer to come on at time you want to feed making sure it goes off a couple of minutes or more before the next programmed "on" time. Any other timer of your own can be used and programmed similarly to operate your Super Feeder. Basically, the number of on-off cycles you timer has is the number of feed cycles available. If included, install the 1.5 gallon hopper (12) on top of one clear extension (only one recommended with large hopper) of two supplied with basic feeder, securing it with one small screw and metal washer on each side (instructions are included with the large hopper). You may not need metal washers to make sure the hopper or clears extensions and lid are securely locked in place with screws protruding correctly into the half-moon recesses of the clear extension. Only tighten as needed to them in place. The upper hopper strap is not needed with the short stand and bowl package deal. Finish filling your feeder with dry food. Tip: You do not need to use a screwdriver each time to remove/lock lid in place, just squeeze upper front and back sides of large hopper or clear extension.
NOTE: Auxiliary terminal strip underneath the feeder may be used instead of the side jack plug for direct bare wire hook-up to keep animals away from jack plug/wire. FEEDER ONLY APPROVED FOR 9 TO 24 VOLT AC OR DC---ANY OTHER POWER SUPPLY WITH THAT VOLTAGE RANGE CAN BE USED. DO NOT POWER WITH HIGHER VOLTAGE BECAUSE YOU WILL VOID WARRANTY!!
ALTERNATE POWER SUPPLY YOU COULD ACQUIRE LOCALLY AND USE
Any power supply with an output of 12V to 24V AC or DC and power from 300 mA to 1000 mA. could be used. If DC output and using jack plug, center of plug must be positive (+). Plug type is 5.5 mm x 2.1 mm. The auxiliary terminals underneath the feeder can be used for bare wire hookup.
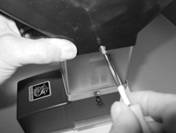
*The blue square type portion/feed time adjustment controller with a while slotted center shown in picture #9 is for early model feeders. All late model Super Feeders have a "multiple-turn" (about 20 turns) micro adjustment controller with a slotted brass shaft at the center that you can turn around and around for very fine adjustment of feed cycle time (1/4 turn change equals approximately 1 second of feed time change). A special small plastic screwdriver with a fine tip is supplied with all Super Feeders to adjust the controller.
PREVENTIVE MAINTENANCE INFORMATION
It is recommended that you periodically inspect and remove excess food residue that may have accumulated on the drum and the slide at the chute’s outlet. Never use sharp objects to clean parts of your feeder, especially the special stick resistant and flexible polypropylene slide. A soft dampened cloth works best to wipe off excess food residue. For a simple cleaning of your Super Feeder®, you may clean the interior of your feeder by brushing the roller with a tooth brush and wiping the inside parts with a damp cloth. Empty the machine and remove extensions leaving only one on the dispenser itself. Plug the power supply directly into an outlet and swipe the tooth brush side to side while running the machine by pushing the reset switch several times as needed. Use a vacuum want to remove residue. Wipe inside clean.
For a more thorough cleaning, you may also remove the six small screws retaining the base of the feeder. The base will come out with gear box and electronics board all in one piece. You can then submerge the whole upper housing in soapy water for a while and flush it all out under a faucet. Thoroughly dry it and re-assemble the base while holding the feeder upside down, making sure that the slide shaker loop wire is resting against the bottom of the slide so the slide will shake. Maintenance Video:
The shaking action of the flexible distribution slide is primarily designed to help expel food without clogging, portion accuracy and prevent bridging inside the machine. The click-clack sound will also alert your pet at meal time like a slot machine. If you want a quieter operation, you can disable that feature as follows: Facing the chute outlet, lift slide, and using a thin small object, flip the trip-wire loop underneath the slide forward and down (toward you) and away from the bottom of the slide.
DETAILED VIDEO SHOWING SET-UP/OPERATION INSTRUCTIONS
[QUICK SETUP-PORTIONS ADJUSTMENT PAGE]
|CLICK ON THIS LINK FOR PROGRAMMING DEDICATED SUPER FEEDER ANALOG TIMER|
|CLICK ON THIS LINK FOR PROGRAMMING SUPER FEEDER ACDT-20 DIGITAL TIMER|
|CLICK ON THIS LINK FOR PROGRAMMING SUPER FEEDER ACDT-19 DIGITAL TIMER|
|CLICK ON THIS LINK FOR PROGRAMMING WOODS SUPER FEEDER ACDT-35 AND ACDT-36 DIGITAL TIMERS|
|CLICK ON THIS LINK FOR TP-LINK SMART Wi-Fi Plug HS100 INFO|
|CLICK ON THIS LINK FOR EXPENDED TECHNICAL INFORMATION ABOUT THE SUPER FEEDER SYSTEM|
|CLICK ON THIS LINK FOR CSF-3 OUTDOOR INSTALLATION EXAMPLES|
|CLICK ON THIS LINK FOR INSTALLING CHUTE COVER, SHAKER WIRE, SCRAPER WIRE AND DISTRIBUTION ROLLER|
|CLICK ON THIS LINK FOR MORE MOUNTING INFO RELATING TO KOI POND FEEDER|
|CLICK ON THIS LINK FOR MORE INFO RELATING TO MOUNTING 1.5 GALLON HOPPER|
|CLICK ON THIS LINK FOR MORE MOUNTING INFO RELATING TO AQUARIUM FEEDER|
|CLICK ON THIS LINK TO CHOOSE A TIMER|
|CLICK ON THIS LINK FOR ANSWERS TO COMMON QUESTIONS|
|GOOD SUPER FEEDER INFORMATION, VIDEOS, ETC...|
You may control your Super Feeder from anywhere using your Smart Phone with our Wi-Fi Socket or even Xfinity Home, Amazon Alexa®, etc...
Still confused? Write to us at: info@super-feed.com
WE HOPE YOU FOUND THIS INFORMATION VERY HELPFUL.